
From prototype to volume: builds, test fixtures and yield
A working prototype proves the idea and almost nothing about whether the product can be made. What each build stage answers, how to design for test, and why first-pass yield predicts cost and schedule.
In short
- A prototype proves the idea. It proves almost nothing about whether the thing can be made.
- Each build stage answers a different question and locks something down. Skipping one relocates its problems, later and dearer.
- First-pass yield is the number that predicts everything — cost, schedule and how much rework quietly damages the product.
- Test access has to be designed in. Retrofitting test points to a finished layout means a new board.
- Involve the manufacturer before layout is finished, when their feedback is still free.
The gap between working and manufacturable
A working prototype is a genuine achievement and a smaller part of the journey than it feels. It demonstrates that the concept functions at least once, assembled carefully by somebody who understands it, from components that happened to be available, tested by the person who designed it.
Volume production asks different questions. Can it be built by someone who has never seen it before, from a written instruction, using components that will still be available next year, with a test that catches faults without the designer present, at a yield that makes the economics work? None of those is answered by a prototype that works.
This article is about closing that gap. The related pieces cover adjacent ground: idea to working prototype for getting to the starting point, and product cost reduction for the economics of the design itself.
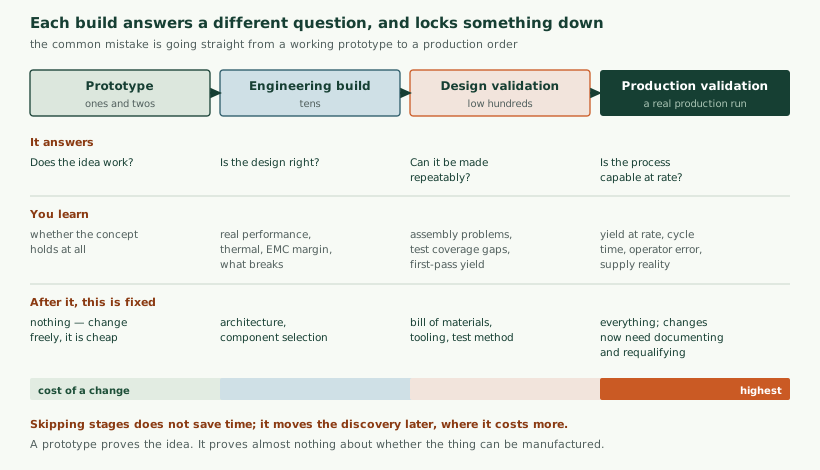
The build stages
Names vary between organisations and the sequence does not. What matters is that each build has a purpose, a question it exists to answer, and a decision at the end.
Engineering build
Tens of units, built to the real design but not necessarily by the eventual process. The question is whether the design is right.
What it finds: performance across units rather than the one that was tuned, thermal behaviour in the real enclosure, pre-compliance margin, and the components whose tolerance matters. It is the first time you see variation, and variation is what a single prototype cannot show.
Two practices make this build worth its cost. Test units at the extremes of temperature and supply rather than on a bench at room temperature — a design that works at 20 °C and fails at 45 °C fails in a plant room in summer. And measure rather than observe: recording actual figures across the batch gives a distribution, and a distribution tells you whether you have margin or luck.
After this build, the architecture and major component selections should be fixed. Changing them later means repeating everything that follows.
Design validation build
Low hundreds, built by the intended manufacturer using the intended process. The question is whether it can be made repeatably.
This is where manufacturing problems appear: components that are awkward to place, a connector that is easy to fit one position out, a panelisation that breaks boards on depanelling, solder joints that are marginal for a particular package, a test that takes too long. None of these shows up when a skilled engineer builds one carefully.
It is also the first honest yield measurement. A first-pass yield in the seventies on this build is not unusual and is a signal, not a disaster — but it must be diagnosed rather than absorbed as normal.
After this build, the bill of materials, tooling and test method should be fixed.
Production validation build
A genuine production run at rate, with production operators, production tooling and production supply. The question is whether the process is capable.
What it finds is different again: yield at speed rather than at care, cycle time, the assembly steps where operators make mistakes under time pressure, and whether the supply chain can actually deliver the quantities on the dates promised.
After this, the product is what it is. Changes require documentation, and possibly requalification, as covered in certification.
Deciding in advance what each build must demonstrate
One practice separates build stages that advance a project from ones that merely consume time: writing down, before the units are ordered, what result would justify proceeding and what would mean stopping to fix something.
Without that, a build with no agreed exit criteria tends to be declared successful because the schedule requires it. Problems get noted as follow-up actions, the next build is ordered, and the same issues appear later alongside new ones. The criteria need not be elaborate — a yield figure, a set of measurements within stated limits, a list of defects that must not recur — but they must be agreed while nobody is under pressure to reach a particular conclusion.
Test, and the fixture
Testing is where the transition from prototype to production is most visible, because the prototype approach — the designer checking it works — does not scale by even one order of magnitude.
| Stage | Catches | Needs |
|---|---|---|
| Automated optical inspection | Missing, misaligned, wrong-orientation parts | Nothing from you; the assembler’s equipment |
| In-circuit test | Shorts, opens, wrong values, some wrong parts | Test pads on nets, a bed-of-nails fixture |
| Boundary scan | Connectivity on dense digital parts with no physical access | Designed-in scan chain, accessible port |
| Functional test | Whether it actually does its job | A fixture that exercises real functions |
| Calibration | Gain and offset in analogue paths | A known reference, and storage on the board |
| Programming and provisioning | Firmware, serial numbers, keys | A programming interface and a secure process |
| Burn-in | Early-life failures | Time and racks; justified only for some products |
| Final assembly test | Faults introduced during mechanical assembly | A test after the enclosure is closed |
The last row is regularly skipped and is where a meaningful number of field failures originate. A board that passed every test and was then trapped, strained or had a connector half-seated during final assembly will ship as good. A short functional check after the product is fully assembled catches this, and it is cheap relative to a field return.
Designing for test
Test access is a design decision, and retrofitting it means a new board. The requirements are modest and must be present from the start:
- Test points on nets that matter, of a size and spacing a fixture’s pins can reach, on one side of the board where possible.
- A way to hold the board repeatably: tooling holes, and keep-out areas where the fixture presses.
- A way to exercise functions without the full system: a test mode in firmware, a command interface, a way to simulate inputs.
- A way to report results that a fixture can read automatically, not a display a human interprets.
- Isolation of sections so a fault can be localised rather than condemning the whole board.
- A programming interface reachable by the fixture, and a plan for what happens when firmware changes after boards are made.
The firmware test mode deserves emphasis because it costs almost nothing during development and is difficult to add once firmware is stable and validated. A command that reports every measurable quantity, exercises every output and returns the results as text turns functional test from a mechanical problem into a scripting one.
What the fixture has to do
A fixture does not need to be elaborate. For many products a machined plate, pogo pins, a microcontroller and a laptop is adequate. What matters is:
- Repeatable contact. Intermittent pins produce false failures, which are worse than no test because they teach operators to retest until it passes.
- Speed. A test taking three minutes at a thousand units a month is fifty hours of line time.
- A clear result. Pass or fail, unambiguous, with the failure reason recorded.
- Data capture. Recording measured values, not just the verdict. This is what makes yield diagnosable.
- Its own verification. A fixture that has drifted will pass bad units or fail good ones. A known-good and known-bad unit run periodically catches this.
The fourth point is the one that pays off repeatedly. A fixture recording only pass or fail tells you the yield. A fixture recording the measured values tells you that a parameter has been drifting toward its limit for three weeks, which is a problem you can address before it becomes a yield collapse.
The mechanical side, which runs on a different clock
Electronics can be revised in weeks. Tooled plastic and metal cannot, and mechanical decisions therefore have to be made earlier and with more finality than the electronics schedule suggests.
- Tooling lead times dominate. An injection mould takes weeks to make and weeks more to adjust. A change after tooling is a genuine cost rather than an inconvenience.
- Choose the process for the volume. Machined or 3D-printed parts suit hundreds; injection moulding suits thousands and requires committing earlier. Bridge tooling exists for the awkward middle and is worth considering rather than forcing a choice.
- Tolerance stack-up matters more at volume. Parts that fit when made individually may not when every dimension sits at the unfavourable end of its tolerance. This is a calculation, not an assumption.
- Fit is verified with real parts. A printed prototype has different shrinkage and stiffness from a moulded one, so an enclosure that fits in prototype form may not in production.
- Cosmetic requirements need agreeing. What counts as an acceptable finish, flow line or gate mark should be written down before the first production batch is rejected on a judgement nobody recorded.
- Assembly sequence is a design output. Whether a board can be fitted without disturbing the connectors, and whether a fastener can be reached with a driver, decide assembly time permanently.
The recurring failure is a schedule where electronics and mechanics are planned in parallel as though they moved at similar speeds. They do not: mechanical decisions must be frozen earlier, which in practice means the enclosure has to be resolved while the electronics are still being validated — and therefore that the board outline, mounting points and connector positions need fixing sooner than the electronics team would choose.
The documentation pack
What a manufacturer needs is consistently underestimated, and the gaps show up as queries during the first build — each one a pause while somebody who knows the answer is found.
| Document | Must contain | If it is missing or vague |
|---|---|---|
| Bill of materials | Manufacturer part numbers, approved alternatives, and which parts have none | Substitutions made without asking, or a line stopped waiting for a decision |
| Assembly drawing | Placement, orientation, polarity, what goes on which side | Parts fitted the wrong way round; found at test if you are lucky |
| Fabrication data | Layers, stackup, finish, impedance requirements, tolerances | A board built to the fabricator’s defaults rather than your intent |
| Special process notes | Conformal coating areas, torque settings, adhesives, cure times | Done differently each build, and differently again elsewhere |
| Test procedure | Steps, limits, what constitutes a pass, what to do with failures | Operators judging; inconsistent results between shifts |
| Programming instructions | Which firmware, how loaded, how verified, how versioned | Units shipped with the wrong or an old build |
| Labelling and serialisation | Content, placement, format, how numbers are allocated | Traceability that cannot be reconstructed later |
| Packing specification | Materials, orientation, ESD requirements, quantities | Damage in transit; disputes about who pays |
| Change and query route | Who decides, how fast, in what form | Decisions made on the line by whoever is present |
Two of these rows repay disproportionate attention. Approved alternatives determine what happens when a part is unavailable — and it will be. A bill of materials naming acceptable substitutes lets the manufacturer proceed; one without forces a stop or an unauthorised swap. It is worth being explicit about which parts genuinely have no alternative and why, because those are the ones to watch.
And special process notes capture the things a designer knows and has never written down: that this area must not be coated, that this connector is fitted before that bracket, that this fastener has a torque limit. Prototypes built by the designer embed all of this silently, and it is invisible until someone else builds one.
Picking a manufacturer for a new product
Choosing where to build is usually approached as a price comparison, which is the least useful criterion during a new product introduction. The cheapest quotation for a mature product may be the worst partner for one that is still changing.
| Criterion | Why it matters more than price |
|---|---|
| Willingness to review before layout | Their early feedback is free; their late feedback is a board revision |
| Comfort with your volumes | Too small for them and you are deprioritised; too large and they may struggle to scale |
| Experience with your product type | Fine-pitch, RF, high-voltage and conformal coating each need specific capability |
| Test support | Will they build and operate the fixture, or only run one you supply |
| Communication | A named contact who answers within a day is worth a great deal during a build |
| Procurement approach | Whether they buy to your approved list or substitute at their discretion |
| Data they return | Test results and yield data, or just a box of units |
| Exit terms | What happens to tooling, fixtures and data if you move production |
Two of these deserve settling in writing before any order. Substitution policy determines whether a part shortage becomes a phone call or a silent change discovered at test. And exit terms matter precisely because they are uncomfortable to raise while a relationship is starting: who owns the fixture, who holds the tooling, and whether the test data and process documentation come with you. Agreeing this early costs nothing and makes a future decision possible rather than prohibitive.
The related question of what you hand over and what remains yours is covered in industrial product development, and the contractual side in choosing a development partner.
The ramp, and why the first months are the hardest
Production does not reach full rate on day one, and the period between first output and steady rate is where most unpleasant surprises occur.
- Yield usually dips when rate increases. Careful assembly at low volume hides process marginality that appears when operators work to a cycle time.
- New operators make different mistakes. A step that is obvious to the person who has done it fifty times is not obvious to the person doing it for the first time on a night shift.
- Supply problems surface at volume. A supplier who delivered five hundred parts may struggle with five thousand a month, and the lead time quoted for a sample is not the lead time for a schedule.
- Test equipment wears. Fixture pins degrade with use, and a fixture that worked for the validation build may drift after a few thousand insertions.
- Field returns begin. The first units in customer hands generate the first real reliability data, and it always differs from what testing predicted.
The arrangement that handles this well is a feedback loop rather than a plan: yield and test data reviewed weekly, failures categorised rather than merely reworked, and somebody empowered to stop and fix a recurring cause instead of absorbing it. Ramps that go badly are usually ramps where nobody was looking at the data until a delivery was missed.
It is also worth planning for the first field returns deliberately — a route for getting failed units back, and the discipline of actually examining them. The first twenty returns from real customers contain more useful information about the design than any amount of laboratory testing, and organisations that simply replace them and move on discard it.
Components and supply
Supply issues delay more product launches than engineering problems, and most are foreseeable.
- Check lifecycle status for every part before layout is finished, not after. A component already flagged as not recommended for new designs should not be entering a product intended to ship for years.
- Check real lead times, not the catalogue figure. A part quoted at twelve weeks with none in stock is a twelve-week gate on your first build unless ordered before the design is final — which means accepting some risk deliberately.
- Identify single-source parts and decide consciously. Sometimes a single source is right; it should be a decision rather than something discovered during a shortage.
- Watch minimum order quantities. A part with a five-thousand minimum is an awkward commitment for a five-hundred-unit build.
- Buy long-lead items early, accepting that a design change could strand them. Usually the cheaper risk.
- Record why each critical part was chosen. When it becomes unavailable in three years, whoever replaces it needs to know what mattered.
The last is a small habit with a large payoff. A component chosen for a specific tolerance, temperature coefficient or timing characteristic looks interchangeable with a cheaper equivalent to anyone who was not there, and the substitution that follows produces an intermittent problem nobody can trace.
Firmware, which does not stop when boards start
Hardware is fixed at a build; firmware keeps changing, and managing that transition causes recurring difficulty.
Practical arrangements that work: load firmware as late as possible in the process, ideally at final test rather than at board assembly, so a late fix does not strand programmed stock. Version everything visibly, so a unit can report what it is running and a label or record says what was loaded. Decide who authorises a production firmware release and how it reaches the factory, because an informally emailed build is how the wrong version ships. And keep the ability to reprogram assembled units, which is the same update-path argument made in security regulation for connected products, applied on the factory floor.
Timeline, honestly
Schedules for this phase are routinely optimistic because they are built from engineering effort rather than from the lead times that actually govern it.
| Item | Typical duration | Can it be compressed? |
|---|---|---|
| Design for manufacture review and revision | 2–4 weeks | Somewhat, with focus |
| Component procurement for a build | 2–16 weeks | Only by ordering earlier and accepting risk |
| Board fabrication and assembly | 2–4 weeks | At a premium |
| Test fixture design and build | 4–8 weeks | Start it in parallel, not after |
| Tooling for enclosures | 6–12 weeks | Rarely, and changes afterwards are expensive |
| Each build, then analysis and fixes | 3–6 weeks | Not really; this is the learning |
| Certification testing | Weeks, plus lab lead time | Book early; see the certification article |
| Ramp to full rate | 4–12 weeks | Partly, if yield is good |
The pattern is that almost nothing on that list responds to adding engineers. Tooling takes as long as it takes; a laboratory has the slots it has; a component with a sixteen-week lead time does not arrive sooner because the project is urgent. Compression comes from starting items in parallel — fixture design during the engineering build, certification booking before the design is final, long-lead procurement before the last revision — each of which trades a little risk for time.
The one place where compression genuinely destroys value is the analysis after each build. That is where the learning happens, and a build whose results are not analysed before the next one is ordered has been paid for and not used.
Yield
First-pass yield — the proportion passing every test first time, without rework — is the single most useful production number.
| First-pass yield | Practical consequence |
|---|---|
| 99%+ | Mature. Rework is exceptional. |
| 95–99% | Acceptable for most products. Worth understanding the losses. |
| 90–95% | One unit in fifteen reworked. Tolerable at low volume, expensive at high. |
| 80–90% | Rework is a significant line activity, with its own defect rate |
| Below 80% | A design or process problem. Not something to absorb. |
Two things about rework deserve stating. It is not free — it consumes skilled labour and line time, and it makes output unpredictable in a way that damages delivery more than the cost does. And rework introduces its own defects: reworked boards have a measurably higher field failure rate than boards that passed first time, because reworking involves heat, handling and mechanical stress. A product with poor yield ships a population of units that are quietly less reliable.
Diagnosing a yield problem
The approach that works is unglamorous and depends entirely on having recorded data.
- Pareto the failures. Almost always a small number of modes account for most losses.
- Separate design from process. A failure appearing across all units points at the design; one clustered by shift, by machine or by panel position points at the process.
- Look at measured distributions, not pass and fail. A parameter whose distribution centre sits close to a limit will fail intermittently and is a design margin problem regardless of the current yield.
- Check the test itself. A meaningful share of apparent yield problems are test problems: a marginal fixture, a limit set too tight, a sequence with a race in it.
- Check supply. A component batch change frequently coincides with a yield step.
The third point is the one that distinguishes teams who solve yield problems from those who chase them. A parameter passing at 96% is not a 4% problem; it is a distribution whose tail crosses a limit, and moving the centre or widening the margin fixes it permanently, while retesting failures does not.
Proving it will survive
Production test confirms a unit was built correctly. It says little about whether the design will last years in its environment, which is a separate question answered by qualification testing on a sample rather than on every unit.
| Test | Finds | Worth it when |
|---|---|---|
| Temperature cycling | Solder joint fatigue, differential expansion, connector problems | Almost always; the most informative single test |
| Damp heat | Corrosion, leakage, coating and seal failures | Humid or outdoor environments |
| Vibration and shock | Mechanical resonance, fastener loosening, fractured joints | Machine-mounted, vehicles, transport |
| Highly accelerated life testing | Design weaknesses, by driving well past specification | Finding margins rather than proving compliance |
| Power cycling | Inrush damage, storage corruption, restart problems | Anything switched frequently or on unreliable supplies |
| Ingress | Whether the sealing works as claimed | Any enclosure with a rating on the datasheet |
| Transport simulation | Packaging adequacy | Before shipping a container of product, not after |
Temperature cycling deserves its place at the top. Repeated expansion and contraction is what eventually breaks solder joints, particularly on larger components and where materials with different expansion rates meet. A few hundred cycles between realistic extremes finds problems that years of bench operation never would, and it is the closest thing to a general-purpose reliability test.
Highly accelerated life testing works differently and is frequently misunderstood. It deliberately drives the product past its specification until it fails, to learn where the margin actually is. Failing is the point: a product that survives everything the chamber can do has margin nobody has quantified, and a product that fails just above its rating has almost none. It is a design tool rather than a pass-or-fail exercise, and it is most useful at the engineering build stage when there is still time to act on what it finds.
The corresponding compliance testing is covered in certification, and the design practices that create thermal and mechanical margin in PCB design in practice.
Traceability
Being able to answer “which units contain that batch of components” is worth establishing before you need it, and the moment you need it is a field failure.
- Serialise every unit, in a form both readable and machine-scannable, applied early enough to follow the unit through assembly.
- Record what went into each: firmware version, calibration values, test results, and where practical the component lots used.
- Keep the test data, not just the verdict. When a field failure appears, the unit’s production test record frequently shows the parameter was already marginal.
- Link it to despatch, so a batch of concern can be traced to customers rather than to a warehouse.
- Decide retention deliberately, in line with the product’s service life rather than the accounting year.
The value becomes concrete in a specific scenario: a supplier notifies you of a problem with a component lot. With traceability, you identify the affected units, check their test records, and contact the specific customers. Without it, the options are to do nothing or to treat every unit ever built as suspect, and neither is a good position to explain.
A worked example
A company with a working prototype of an industrial sensor wants five hundred units in the first year, rising to a few thousand. The prototype was hand-assembled and works well on the bench.
A realistic plan:
- Design for manufacture review first. Before anything is ordered, review for test access, panelisation, component availability and assembly awkwardness. Expect a board revision — it is cheaper now than at any later point.
- Engineering build, 25 units. Test across temperature, measure the spread rather than the one good unit, run pre-compliance with the real enclosure and cables. Send a few for temperature cycling.
- Act on what it shows. Typically a handful of changes: a component running warmer than expected, a tolerance with insufficient margin, an emissions peak needing attention.
- Fixture design in parallel with that analysis, not after it, since it takes weeks and gates the next build.
- Design validation build, 150 units at the real manufacturer with the real process and the fixture. Measure first-pass yield honestly and diagnose the losses.
- Certification booked during this period, with a contingency slot.
- Production validation, 300 units at rate with production operators. Confirm yield holds when people are working to a cycle time rather than carefully.
- Then ship, with the documentation pack complete and a change process in place.
Realistically eight to twelve months, dominated by component lead times, tooling, fixture build and the analysis between builds. A team under pressure will be tempted to combine steps 5 and 7, and doing so is defensible provided everyone understands that the question step 7 answers — whether yield survives production pace — is being deferred to real customer orders.
A short glossary
| Term | Meaning |
|---|---|
| First-pass yield | Proportion of units passing every test first time, without rework. The number that predicts cost and schedule. |
| Design for manufacture | Designing so the product can be built reliably by the intended process, rather than only by its designer. |
| In-circuit test | Electrical test of individual nets and components via physical contact, catching shorts, opens and wrong values. |
| Functional test | Test of whether the assembled product does its job, rather than whether it was assembled correctly. |
| Bed of nails | A fixture of spring-loaded pins contacting test pads when a board is pressed onto it. |
| Boundary scan | Testing connectivity through a chain built into digital devices, where no physical access exists. |
| Panelisation | Arranging several boards in one panel for assembly, then separating them. How they separate matters. |
| Approved vendor list | The agreed set of acceptable sources and alternatives for each part. |
| Highly accelerated life test | Deliberately stressing beyond specification to find where margin ends. Failure is the objective. |
| Qualification | Testing a sample to establish the design will survive its environment, distinct from testing every unit. |
| Ramp | The period of increasing output between first production and full rate, where yield and process problems surface. |
What usually goes wrong
- Straight from prototype to a production order. The single most expensive mistake in this field.
- No test access. Discovered when the fixture is designed, fixed with a new board revision.
- Components chosen without checking availability. A part with a forty-week lead time or a single source becomes the schedule.
- Manufacturer involved after layout. Their useful feedback arrives as change requests.
- Yield accepted rather than diagnosed. Ninety percent becomes normal, and nobody revisits it.
- Test recording only pass and fail. Leaves you unable to see a problem developing.
- Firmware changing after boards are built. Manageable with planning; chaotic without.
- Documentation written after the first build. The queries during that build are the cost of the missing pack.
When to stop and redesign instead
Occasionally the right decision during this phase is to go back rather than forward, and it is worth naming the signals because sunk cost makes them hard to act on.
- Yield stuck below about 80% with no single dominant cause. Many small losses across different mechanisms usually indicate a design with no margin anywhere, which reworking will not fix.
- A parameter that only passes with selected components. If units pass by picking favourable parts, the design depends on a distribution you do not control.
- Repeated certification failures at the same frequency. After two attempts at incremental fixes, a layout change is usually cheaper than a third booking.
- Test time dominating the build. A functional test taking many minutes because the design is hard to verify will constrain output permanently.
- A critical component going obsolete before launch. Better to redesign around an available part than to buy a lifetime supply of something ending.
The calculation is straightforward once stated: a board revision costs a few weeks and a known sum, while carrying a marginal design into production costs rework, field failures and a permanent ceiling on output. Teams generally know which situation they are in; what is difficult is saying so after a schedule has been committed. Raising it explicitly, with the numbers, is more useful than hoping the ramp improves.
If you take one thing away
Every build stage exists to find a particular class of problem while it is still cheap. That is the entire logic of the sequence, and it is why skipping a stage never saves what it appears to.
The practical version: before ordering production quantities, be able to say what the first-pass yield is, on units built by the people who will build them, using the process that will build them, tested by the fixture that will test them. If any of those three is still hypothetical, the production order is the experiment.
How we help with this
We work on the transition: design for manufacture review before layout is committed, build planning, test strategy and fixture design, the documentation pack a manufacturer needs, and support through the build stages including diagnosing yield problems when they appear.
We do not operate a factory, so we work alongside your chosen manufacturer rather than in place of them, and we would not quote a yield figure before seeing the design and the process. Where a design is already finished, the useful first step is usually a review against what the build stages will ask of it, because that identifies what a new revision would need to include before anyone commits to tooling.
Related reading: idea to working prototype, product cost reduction, PCB design in practice, certification and embedded firmware practice. Services: industrial product development. For the wider picture, what industrial IoT actually is.
Questions we are asked about this
What clients ask before starting
How long does it take to go from prototype to production?
For a moderately complex electronic product with no unusual requirements, typically six to twelve months from a working prototype to shipping volume, and longer where certification, tooling or unusual components are involved. The engineering is rarely the constraint. Component lead times, tooling lead times, test laboratory bookings and the iterations between build stages dominate, and those run on their own schedules regardless of how many engineers are available.
Can we skip the intermediate builds?
You can, and the discovery simply moves later. The purpose of each build is to find a specific class of problem while it is still cheap to fix, so skipping one does not remove its problems — it relocates them to a point where a fix means scrapping stock, retooling or recalling. Where schedule pressure is real, combining stages with a clear-eyed view of what is being accepted is more honest than pretending the stage was unnecessary.
What is first-pass yield and why does it matter?
The proportion of units that pass every test the first time, without rework. It matters because it is the single number that best predicts production cost and schedule. A product at 70% first-pass yield needs a third of its output reworked, which consumes labour, introduces its own defects and makes output unpredictable. Yield below about 95% at volume usually indicates a design or process problem rather than bad luck.
Do we need a test fixture?
Almost certainly, above a few hundred units. Manual testing does not scale, is inconsistent between operators and produces no data you can analyse. A fixture need not be elaborate — for many products a simple bed of pogo pins, a microcontroller and a pass or fail light is adequate — but the design has to allow for it, which means test points placed deliberately rather than wherever there was room.
Who owns the test fixture?
Worth settling in writing before anything is built. A fixture designed and held by a contract manufacturer can make moving production difficult, since replicating it elsewhere takes time and money. Owning the design and the documentation, even where the manufacturer builds and operates it, keeps that option open without changing the day-to-day arrangement.
What documentation does a manufacturer actually need?
More than most teams expect. Beyond schematics and layout, they need the bill of materials with approved alternatives, assembly drawings, any special process instructions, the test procedure and its acceptance criteria, packaging and labelling requirements, and a route for asking questions. The gaps in that pack are what produce the queries that hold up a first build.
When should we involve a manufacturer?
Earlier than feels natural — ideally while the design can still change, which means before layout is finished. A manufacturer can flag component packages that are awkward for their line, panelisation problems and test access issues while they cost nothing. Presenting a finished design and asking for a quotation forgoes all of that, and their feedback then arrives as change requests.
What do you actually provide?
Design for manufacture review, build planning, test strategy and fixture design, the documentation pack, and support through the build stages including diagnosing yield problems. We do not operate a factory, so we work alongside your chosen manufacturer rather than replacing them, and we would not promise a yield figure before seeing the design and the process.
What stands between your prototype and a production order?
Tell us where the design is, what volumes you expect and whether a manufacturer is chosen. That is usually enough to say what the realistic path and timeline look like.